TiltShift Lens Tutorial:
As you may or may not know, TiltShift lenses are a specialty type of lens that allow for adjusting the focal plane of a camera. They are commonly used to capture corrected perspective architecture shots, interesting portraits, or to create scenes that look smilar to miniatures set due to a illusory shallow depth of field (miniatures as in a model town, or model train set). To capture the look with the lens itself will unfortunately set you back a few thousand dollars as they are high-end specialty lenses and do not come cheap.
However thats why we have Photoshop; as we can easily emulate and create the look in a few steps!
What you will need:
- A Digital Camera (DSLR)
- Photoshop CS
- A computer (OS X or PC)
- A RAW or high resolution JPEG to edit
- Preferably taken from a far bit of distance away from the subject. This effect works best from rooftops and high vantage points over urban landscapes
How To
Step 1:
Open Photoshop and then open your image/photograph.
Step 2:
If you are using a JPEG image skip to the next step
If you are using a camera RAW file you will be presented with the editing dialog window, where you will be able to make various changes to the look of your photograph. Edit and then carry on to the next step.
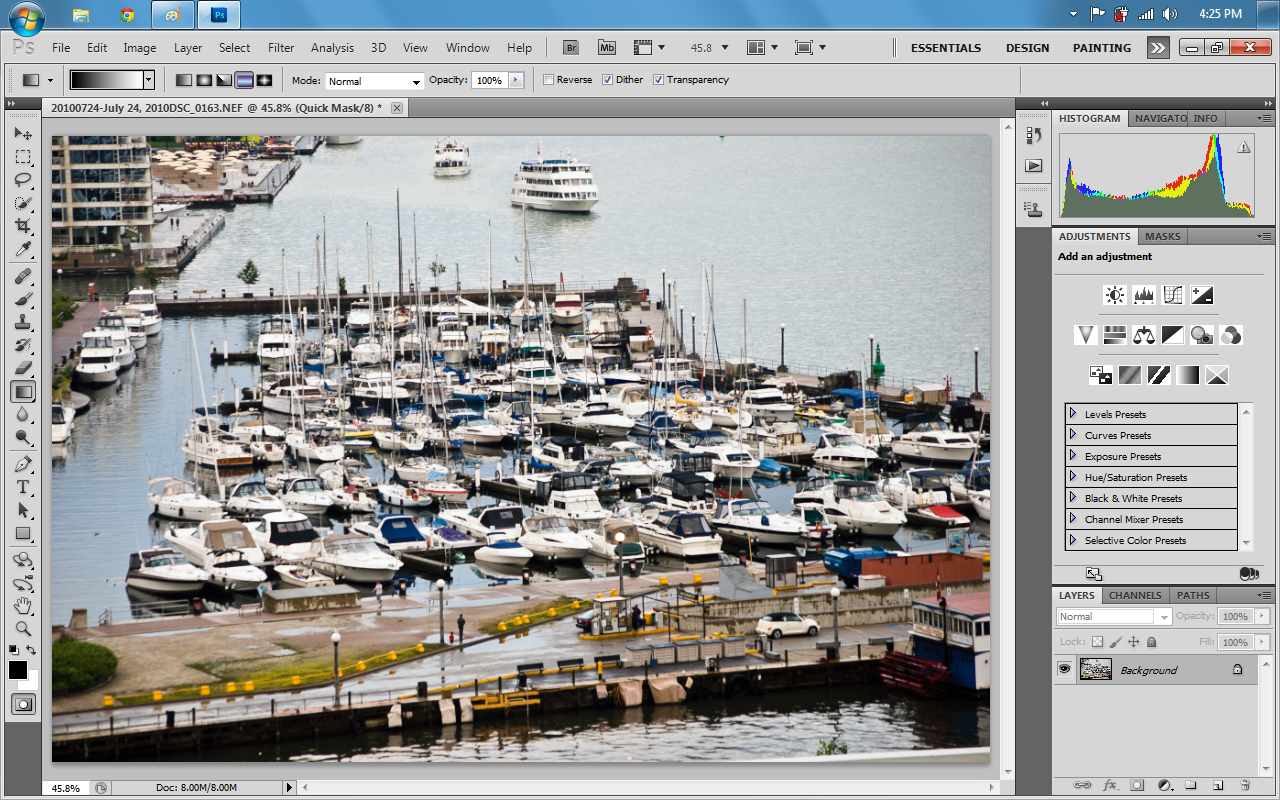
Step 3:
Now that you have your file open in the main photoshop window enter quick mask mode by clicking on the box in the bottom lefthand toolbar or by pressing (Q) on your keyboard.
Step 4:
Now that we are in Quick Mask mode press the (G) key or click the gradient tool on the tool bar. Make sure to select the middle gradient mode highlighted in the second screenshot.
Step 5:
Using the Gradient Tool, create a gradient across your wanted focal point of the photograph. We recommend that you play around with getting the right banded colour gradient across your subject.
Step 6:
Now that you have found the right gradient selection, toggle off Quick Mask mode by either clicking on the toolbar at the bottom or pressing (Q) on the keyboard
Step 7:
Now that you have exited Quick Mask mode you will notice there are selection boxes across part of your photograph, this is good, now click on "Filter" in the menu bar and go to "Blur" and then to "Lens Blur"
Step 8:
You will see a Settings dialog box open for the Lens Blur filter, you can match our settings or play around with it and figure out your own. Once you have the desired blur level, click Ok and go back to the main window.
Step 9:
Now that you have your desired blur level, click on "Select" in the menu bar and click deselect to let go of your gradients selection.
Step 10:
To increase the illusion of the photograph being of miniatures or seeming at least far away click on the Saturation levels layer tool on the right hand side and increase the colour saturation in the photograph. When you are done, be sure to select the "background" layer in the layers panel
Step 11:
Open the Filters menu again and to to sharpen and then to Unsharp Mask. A settings box will open for you to make your desired adjustments to the sharpening effect in. Once you are done click Ok.
Step 12:
We are almost done!
Last thing to do is to save your newfound tilt-shift photograph so you can show it off to the world.
Go to File in the menubar and click Save As.
Specify where you want to save it and save it as a JPEG.
Once you have done that and clicked Save; a new dialog window will open you prompting you for settings for saving the JPEG.
Drag the quality slider all the way to 12 or Maximum.
Select Optimized and click Ok
Step 13:
Thats it! Go to where you saved your file and post it online and show everyone what a amazing lens you don't have. They'll never know!