Friday, 23 November 2012

Photography Tutorial: Light 101


Natural Light
A great way to improve your photography is to learn how to harness the power of the most important and powerful (yet cost effective) light source available to us - the sun. The conditions natural light provides varies with where you are, the weather, and the time of day. Once you can observe which types of light create which types of moods and atmospheres, you can begin to plan when and where you take your photos in order create a more meaningful photograph.


Hard Light:
Hard light comes from direct sun on a clear day. This light is strong and direct and casts deep shadows with hard edges. Typically this isn't a good time to be shooting outdoor portraits, as hard light can emphasize imperfections and make for an unflattering head shot. Mid day light is ideal for shooting architecture and bringing out colours. You may have heard of the "golden hour": this is hard light at the beginning of the day shortly after the sun has risen, or the end just before it sets. While the light is still hard, it is significantly softer than at mid day and comes at your subject from a lower angle, bringing out form and texture. 


Soft Light:
As you may have guessed, this type of light arises from the opposite situation: light from a cloudy day, or in the shade. This gives shadows a soft edge and provides very little contrast. Use an overcast day for shooting portraits or nature still lifes (such as leaves or flowers). Just keep in mind that if you include the sky in your composition, it will most likely turn out a bright white - something to avoid if that isn't the look you're going for.


Dramatic Light:
The opportunity to make use of natural dramatic light is much more rare than hard or soft, so be sure to take advantage of it. Dramatic weather such as thunderstorms create dramatic light. Some things to look out for are right before the storm, or afterwards when the sun breaks through the clouds. Dramatic lighting makes great landscape and architecture photos. Just keep in mind: if you're shooting before the storm, make sure you give yourself time to get your equipment somewhere dry to avoid the unthinkable.


Sunrise and Sunset: 
The nature of a sunrise or sunset will depend on the weather: it could be hard, soft, or dramatic. This differs from the golden hour since the sun has already risen or hasn't yet set in those cases. Sunrises and sets usually feature the sun still visible in the sky. The light is full of colour to give photos an almost painted look. Pretty much anything looks good at sunrise or sunset, so it's worth taking the time to get up early or staying out to catch the sunset to get a guaranteed shot. You'll see this a lot in travel photography. A photographer can't ride on sunrise and sunset photos for an entire portfolio, but practicing a few never hurt anyone.

Naturally Lit Interiors:
LIght from the sun influences photos taken indoors as well, streaming in through doors and windows. Even when you don't have your camera with you, try to pay attention to where light comes from indoors. Typically the weather will have less impact as the light filtering in is usually more on the hard side, but this will depend on the size of the windows available. This can create a very dramatic and moody effect, especially in old or abandoned buildings. Some photographers use HDR (tutorial at link) to show all detail in a naturally lit interior. Try experimenting with both HDR and shadowy corners and see what you prefer.

The beginning and the end of the day are textbook examples of "good" natural light, but there's no reason to limit yourself. Be creative and try some portraits on a sunny afternoon to learn why they don't work, or think of a scenerio where they could work. The great thing about natural light is that it allows you to constantly improve your photography by observing the light around you and thinking about what subject would go well with it and what story that photograph would tell.

Sunday, 18 November 2012

Photography Tutorial: Sharpening

Photography Tutorial: Sharpening

What is Sharpening

The unfortunate truth about all digital recording/capturing technologies is that they convert analog signals into samples of the original. The frequency of how often the signal is sampled determines how well the original analog signal will be when digitally reproduced. While modern devices have high sampling rates of 12 bits for each of the RGB (red, green, blue) spectrum colors, this number is actually quite coarse, or crude compared to reality. 

The real world is comprised of infinite numbers of colours and shades, to observe this one has to only look around them, at the sky, forest, water. You will see enumerable shades and tints of the same color; so while capturing a large enough portion of this information to create a (in our eyes) high resolution photograph, the digital recreation pails in comparison to the real thing. 

This creates the problem of an inherent fuzziness or noise in any digital recording or abstraction, due to it being only a fragment of information of the original. So in order to combat this, we employ a technique called sharpening. This enhances the photograph and makes it look "sharp", "in focus", and gives a higher clarity to the photograph. This is also one of the major differences between a professional photographer's photographs and a amateur or beginner's.

So with that lets show you how to sharpen like a pro!

How to Sharpen

While there are enumerable ways to sharpen your photos, and different schools of thought for each one,  a good way to sharpen that works for many different photograph types, is the High Pass filter. The High Pass Filter works by sharpening edges only, leaving non-edges unsharpened. This is the goal of sharpening and what all the various other sharpening filters aim to help you do.

Now on to it!

Step 1: Open Photoshop

Step 2: Open your image


Step 3: Duplicate the original or background layer

Duplicate the original layer (also known as the Background layer in photoshop)

To duplicate the background layer, select it from the layers panel and press the keys CTRL & J at the same time, if you are on a mac press Command & J. This will create a duplicate of the layer. 
Another option is to right click on the background layer and select "Duplicate Layer"


Step 4: Change the blending mode of the new layer to Overlay

The High Pass filter, when ran, turns all non-edge surfaces into a neutral grey colour, this may seem off-putting at first however we made a duplicate layer for this very reason. Go back to the layers panel and where you see a drop-down menu with "Normal" in it. Change this to "Overlay". Switching the panel to "Overlay" causes photoshop to only apply the non-neutral grey areas from the selected layer to the layer below. This means we will only see the edges of our original photograph sharpened.

One side effect right now is that your photograph will appear to have a large amount of contrast, this is to be expected and will only be temporary.


Step 5: Apply the High Pass filter

Now that you've accomplished the previous steps, go to the "Filter" menu at the top of the screen and choose "Other" and then "High Pass".
The High Pass filter is fairly simple to use, there is only one slider to increase or decrease the amount of the filter applied. Checking the "Preview" option on the side will show you your changes on your photo as your move the slider. 

To sharpen with the High Pass filter, start with a low radius value around 1-2 pixels and drag the filter to the right or to the left. If you begin to see halos or glowing around the edges, you have sharpened too much, decrease the radius slider. We used <--> as our value, yours will differ, play with it to find what works for you. How much you sharpen will very from photo to photo, so do not expect your values to always be the same. 


(Optional) Step 6: Fine tune the sharpening.

You can fine tune your sharpening even more so by changing the blending modes, changing the blend to Hard Light or to Soft Light will adjust the intensity of the sharpened layer. Hard Light will increase the sharpening and Soft Light will decrease it. This is at your discretion, try both to see the effects.

So thats it folks! We hope you enjoyed this tutorial and found it helpful. We look forward to starting on next weeks tutorial and creating something useful as always.


Happy Shooting!

If you are a fan of this blog, you can sign up for email subscriptions or RSS feeds on the right, and/or follow us on your favorite social network!

Friday, 9 November 2012

Photography Tutorial: Composition

Composition and the Rule of Thirds

 When it comes to taking better and/or more interesting photographs, learning about composition and the rule of thirds will give you a boost towards capturing them, that no increase in equipment quantity, quality or simply how many photographs will take can provide. This tutorial was written to help, alongside some photographs, understand when and when not to apply the "Rule of Thirds" to composing your images.

What is the Rule of Thirds


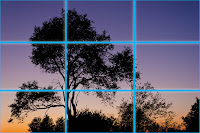
The rule of thirds (image of its overlay above) is a visual rule for composing visual scenes which states that a image is most pleasing to the human viewer when the subjects, zones, or regions are composed in the image along imaginary lines. These lines bisect the image into nine quadrants or sections. It is seemingly counter-intuitive to apply such a mathematically precise type of rule to the 'image arts', but it works very well for the subjective field. The composing of subjects or scenes with the focus being along the lines and at their intersections creates a sense of balance in the image, and can be used to draw out motion, perspective, size and volume emotionally in the viewer. This rule allows for making a photo not too static and not to visually complex and busy.

The Rule of Thirds in use


So you can see how to overlay the rule of thirds mentally when composing a scene, below are some examples of the rule of thirds in use, to explain why and how it works in action.


The focus of this photograph is the tree sapling on the rock cleft, its positioning towards lower right corner on the intersection of the first horizontal line and the second vertical line of the rule of thirds grid is attractive to the viewer. The shadow to the right of the tree is balanced into taking a third of the photo approximately which compliments feeling the sapling is jutting out on it's own.


The rule of thirds is easier seen applied to this photograph with the lines of composition trisecting the photograph into thirds. The lines of division divide the solid sky, from the foggy trees, from the less-foggy more-clear foreground. This creates pleasing planes of composition for the images horizon.


As stated above, the rule of thirds can be used to cause the viewer to experience greater feelings of motion when looking at your photographs. In the photo above, the waters route from the upper right corner of the photograph to the bottom left corner, paints a track for the eye to follow when viewing and in that, provides more visual action perceived.  


Sometimes however, you may want to showcase symmetry or a static image and have your subject in the center of your photograph. This is OK! The rule of thirds is meant to be broken, in the above image the rule of thirds is both broken and used at the same time. The suns rise between the buildings, being the central focus of the photograph, captures the viewers eye and then brings it down to the intersection through the street car lines. The eye then meets the stopped car and cross-walking man on the road, which provides more interest. This is just our example of breaking the rule, we trust you'll have no problem violating it yourselves to get better images, it is just another tool in your photography utility belt. 

If your liking what your reading here, give my flickr page a look, and/or follow me on your favorite social network.


Friday, 2 November 2012

Creating the Lomography look

Creating the Lomography look 

aka. How to create your own Instagram photos

In recent years with the advent of consumer smartphones, certain apps on the app market has made it possible to take photos that look like they were taken in a Lomographic camera. These photographs usually feature odd and/or unique colouring, strong vignettes, light streaks, blur and high contrast. These apps and modern lomographic film cameras take their cues from a photographic movement that began in the 1990's when the creators where inspired by cheap russian toy cameras, such as the LOMO LC-A. 

This tutorial was created to let you create the lomographic look in a more controlled environment than Instagram or a cheap camera and with your digital camera. So dig up or take a few photos you'd like to experiment with and lets begin!

Below is a photo of James Gray, musician extraordinaire, at a wedding he played. This will be the subject for Shutter Science's tutorial.

Step 1: Open your image


Step 2: Create your selection

Select the Lasso tool and then change the feather to 70-90. Then draw a loose circle around the subject of your photo.


Step 3: Invert the selection

Now that you've slected the subject, we need to invert that selection and select everything but your selection
In the menu bar go to Select and then to Inverse, which will then invert our selections.


Step 4: Create the vignette shadow

With your selection inverted, create a levels adjustment level and tone down the mid tones and highlights of the selected rim of the subject, this will create the illusion of a vignette. After you have done this flatten your image.


Step 4: Creating the right colours

Lomographic photographs have very rich and unique colour tones, the next stop is to replicate that in our photo.

Add a curves adjustment layer now, and individually select the colour curves to play with them. You will see we went with an 'S' curve for ours, experiment to find what works best for you.


Step 4: Blurring

Lomographic cameras are notorious for having lens blur. The fourth and final stage in our tutorial will be replicating this soft focus look in our image. Duplicate your background layer and create a clipping mask on this layer.


Then select the brush tool and set it to be black. While having the clipping mask layer selected.


Create a brush the size of your subject by manually increasing brush size or pressing the '[' and ']' keys respectively to lower and raise the size. Click once to make a black spot the size of your focal area around your subject, you will not directly notice this, look in the layers panel to see the silhouette of the brushes work.


Next, after selecting the duplicated image layer, go to filter and then to gaussian blur to add your blur, the filter is quite powerful so experiment to find the right strength. After that your done! Congratulations!


Completed! 


Here's our finished photograph! Ready for sharing!


Thanks to our model James, make sure to check out his music at: 

http://www.facebook.com/jamesgraymusic1990
http://www.youtube.com/channel/UCeRWfnK5TV41F0utOJXHVLw
http://music.cbc.ca/#/artists/James-Gray